Thursday, September 15, 2016

Halloween ATC's  (Artist Trading Cards)

I still love to do ATC cards and enjoy trading them across the world.  Since I'm a bit of a Halloween nut, Halloween cards are my favorite to make and receive.  Here are four that I made.  All of them begin with the same base paper


I used a gelli plate to make the paper.  I load up the jelly plate with orange color and threw in some brown and green, added stencils etc.  The great thing about gelli plates is that if you don't like the first layer, or its too plain, just add another until you like it!  Once the paper was completed and dried, I cut it to ATC size and adhered it to cardstock.   Here are close up pictures of the four cards.  They all have in common, the background, lettering using a Dymo label maker and some element of fabric pulled from my stash of Halloween fabrics.  By the way, the Dymo label maker is my new favorite crafting supply.  I have been wanted one for awhile but had trouble finding this old fashion type.  The new ones are all electronic and use a different type of tape.  I finally ran across one at "The Container Store" and it was cheap!  I grabbed it up along with a extra set of label tape for future use.

"Frightful" - Gelli plate background, boo! stamp, vintage image with an hand cut witch hat on top, fabric skeleton and dots of acrylic paint with a dot of gel pen on top.

"Trick or Treat" Gelli plate background, Dymo label maker lettering, fabric skulls, 3D pumpkin sticker from the craft store, ghost stamp by Darci (colored in with makers - I use a light gray around the edge of the ghost)

"Things that go Bump in the Night" - gelli plate background, orange and black Washi tape embellishment, monster man cut out using a cricut,, fabric skull, Dymo label maker words, moon stamp

"Are you my Mummy" - gelli plate background, dymo label maker for the words (for some reason they do not include a question mark", fabric candy corn, Mummy stamp by Darci, Acrylic paint dots with a yellow base and another orange dot on top, bat cardstock sticker with clear coating on top and embellished with gel pen.

I hope you enjoyed my cards.  These are also the same size you would use for pocket letters so, they would be fun for something like that also.

Friday, September 9, 2016

Boo Mason Jar Votive holder

Here is another fun quick Halloween project.  I happen to already have on hand a bunch of Mason jars so, it was a perfect project for me with most of the materials already in my home.


Here is how I did it.

1)  Using purple, orange and white acrylic craft paint, I squirted one color in each of the jars and swirled it around until the jar was completely coated.  On my first one I used a thicker artist quality paint and it didn't work that great because it did not want to move around the jar, even with water added.  I switched to a cheaper quality craft paint and it worked perfect.  After the jar is completely coated, leave the top off until the paint is dry (drain off any excess first).

2)  Spray paint the lids black

3)  For the middle decoration I first used black card stock cut to 3 inches wide and the length was the width of the jar.  I adhered it to the jar with tape.  For the next layer, I used an orange burlap ribbon with wire and wrapped that around with a tie and the front (not a bow, just a simple wrap tie).

4)  The next layer was made using my Cricut cutter and the Ribbons and Rosettes cartridge.  If you don't have that, I think an big Halloween colored flat silk flower would also be very cute.  I hot glued that on top of the ribbon.  The letters are made from wood that I purchased at Hobby Lobby.  They were already black and I used a white gel pen to try to make them pop better.

5)  The last step was skeletons cut from some skeleton garland purchased at the dollar store.  I cut 3 off the garland and hot glued them in place.

That's it!  It's all ready for my shelf or mantle this Halloween.

Monday, September 5, 2016

Potion bottles for Halloween decorations etc

I try to save interesting bottles during the year to alter for other uses.  My daughter gave me these tins because she and her husband enjoy this particular brand of loose tea.  They are tins with a flat top.

Here is how I altered them:

1)  I sanded the tins to create a rougher surface for the paint to adhere to.
2)  I used Adirondack alcohol inks to color the tins.  I used a combination of drops and smears to create an aged "Halloween, spooky" look
3)  I downloaded free images from the Graphic Fairy internet site including the witch girl and the potion labels.  I printed these out for the size of my tins
4)  Using matte medium, I adhered the images to the tin
5)  On the top, I used beads on one and an old ornate earring clip I had on the other.  I also used a little bit of fiber.

That's it!  It's a fairly simple project ready to stuff with candy corn or whatever other Halloween fun thing I can think of.  Altoid tins would also be perfect for this.   I included a couple more pictures which are zoomed in for you.


Thursday, September 1, 2016

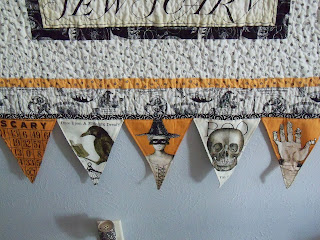
Halloween quilted wall hanging


This quilt is made from a design by Janet Wecker Frisch.  I bought a kit to do the project which takes away all the issues of matching fabrics etc.  All of that is done for you in a kit.  This one came with the yardage I needed except for the backing and filling.

The front goes together very quickly.  I was able to cut and sew it together in one day.  In another session, I did the pendants and the Halloween swag sign.  For the filling, I bought 100% cotton which is what I usually work with.  I recently bought a package of 80% cotton and 20% poly because that particular store didn't have the 100% cotton.  I really disliked working with it and was very surprised at how much different it worked.  I had issues with it wrinkling which made the quilting process more challenging.  So, I will never buy that again!

The fabrics on this quilt are so cute and you can order the pattern using the link below.  I have completed similar projects using a fabric panel as the center.  They are great to work with and I think they are perfect for holiday quilts.

This wall hanging could be used as a small lap quilt.  I thought I might do that someday and elected to use a little gold safety pin to attach the Halloween sign versus sewing it on.  I also think that will make storage easier because I can remove the sign to make sure it does not get wrinkled in storage.  Another variation I made is with the Halloween letter swag.  It originally suggests sewing on all sides with a small opening and then turning it.  I decided to place the backing and front side back to back, sew around all edges twice and then fray it.

More views:


Link to retailer:
http://www.equilter.com/pattern/625/sew-scary-halloween