Tuesday, October 20, 2015

Mixed Media art journal page

I had started a page in my journal and got several layers of the background done when I lost my inspiration.  I put it aside and then came across an artist who did a youtube video that inspired me to finish the page.  I don't have the same supplies she has in the video but used her ideas and how she drew the dragon flies to complete my page.  I'm putting a link to her video at the end so, you can enjoy that also.

Here is my page:

I used sheets of printed tissue paper by Tim Holtz, multiple different stencils where I painted some and used modeling paste on others.  There is a variety of inks, acrylic paints and stamps.  It was fun to do, which I think I say a lot but, when it comes to art, that's what I feel!

INSPIRATION VIDEO FROM YOUTUBE:
Artist:  Niki in Wonderland


Saturday, October 17, 2015

Witch girl

Sometimes when I get in a creative rut, I just pull out paper and a pencil and start drawing.  That is how this witch girl started.  I started with the head and after a few erasers marks ended up with a witch girl.  She is on Strathmore 140lb watercolor paper.

Watercolor witch girl
 Here is a picture of the supplies I used:

After my pencil outline, I used a waterproof pen (micron 005) and outlined pencil lines in ink.  I filled in the hat with stars and outlined those also.  

The stars were filled in with a glitter gold gel pen.  Do that prior to the watercolor because some of the glitter comes off and goes into the hat which I really liked.  I used Neocolor Watersoluble pastels to paint it in.  Using a brush filled with water (the green one in the picture), I apply the wet brush to the pastel and then onto the paper.  Neocolors produce a really nice vibrant color.

For the neck, I used a marker which I forgot to put in the picture.  It's a waterproof marker.  I then used a graphite pencil on the side on the neck to make it look 3D.  The very center of the neck has some white gel pen to bring in a highlight.  The face is done with colored pencils and I did some blending of the colored pencils using a colorless blender by prismacolors.  The color pencils were also prismacolors.

The Happy Halloween is from a TJ Designs stamp using their Halloween set.  I have gotten a lot of use out of this set.  I have used it many, many times.  Here is a link if you are interested:

http://www.tweetyjill.com/store.html

Thanks for looking at the blog.  I'm still in a Halloween mode and am working on some ATC's now

Wednesday, October 14, 2015

Halloween tri-fold - home decoration

I have collected a lot of cute little Halloween things so, I decided to bring some of it together by making a decoration for my mantel or one of my shelves.  This is made from a heavy duty cardboard that came with a shipping package.  I saved it and left it the height it came with but changed the width to 12 inches.  I then scored it at 4 inches and 8 inches.  Now, it neatly folds enough for it to stand on its own.  The back is simply painted and I did not fuss with it since it will not be seen.

 The front is made with a painted base color of pumpkin orange (acrylic paint).  I then covered it with a Halloween napkin that had a multiple skull design.  Only small parts of that peek through in the overall design.  I used medium gel to apply the napkin and the did another coat on top.  After it was dry, I decorated with layered papers, inks, and Julie Nutting stamp with a hand drawn frankenstein type stitching in the face.  I also used inches from a swap, die cuts and ribbons.  The final touch was some glass bead medium gel around the inches and several other places to add some texture.  It was so much fun to put this together.  Here are some close up pictures.

Tuesday, October 6, 2015

Trouble with rub-on's???

I have this really cool set of Halloween rub-on's that I got last year but I could not get them to rub off!  I put so much pressure down that it gave my projects indentations.  I pulled the set out again this year and since they were fairly useless I decided to experiment with them.  I used Elmer's Xtreme glue stick to the back of the rub-on after removing the protective white sheet.  I then placed it on my project and voila!  They came right off and stuck to my art beautifully.  So, you may want to give it a try if you are having the same issue.  Be sure to test it first on a waste.

I also wanted to talk about the Fiskars Amplify scissors.  I got a pair last year from Santa Claus and I love them!!  I cut a lot of cardboard and I either use my paper cutter or these scissors.  The Amplify scissors cut it with no issue and without making my hands sore from putting pressure on scissors to get them to cut.  So, if you make a lot of ATC's, pull out your coupons or start your Christmas list.  They are a great addition to the craft room.

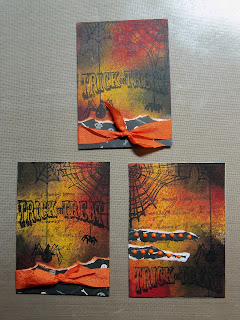
Here is my latest ATC creations for Halloween.  For these, I started with a white card stock, sprayed it with Dylusions sprays in brown, orange and red.  After it dried, I used a yellow gelato to bring in some brighter color.  That was randomly put through the centers and spread around a little using water.  I then used a word/sentence stamp in brown ink, topped it with other Halloween stamps in black ink and added either ribbons, papers or pearl drops for embellishments.  I love using sprays and they make the backgrounds much more interesting over a flat color.

Glue used to help rub-on stickers "rub-off" and stay in place plus, my Amplify scissors

Halloween ATC's

Monday, October 5, 2015

Pocket Letters

If you enjoy art swapping, you have probably heard of pocket pages.  Pocket pages is like having a pen pal but, it incorporates crafting and art fun.  The idea is to buy a set of the plastic protective sleeves used to store trading cards.  There are 9 slots per page and each one is filled with something decorative on the outside.  Tucked behind the outside decoration are small crafting or other goodies that you send your pocket pal friend.  In addition, at least one slot is used to insert a letter from you.

The internet is full of ideas to decorate your pages and there are many places to swap.  There is a group on Facebook and in addition, the Swap-Bot trading site offers opportunities to trade.

Here is a pocket page I am working on for a swap that I'm in so, this one will be sent off to a friend.  She will be doing her version of one and sending it to me.  I still need to write and insert my letter and finish filling the pockets.  This is for a Halloween version of pocket pages.


Thursday, October 1, 2015

Take #2

Did you ever do a picture and you like it at first but then later think it needs something more?   That's the way I felt about this pencil whimsical picture.
I liked the face but decided the background was very boring and that the quote didn't quite express what I meant.  This is when I decided to try a second take.  The first one is made with colored pencils on the face and markers for the hair.  On the second one, I cut out the girl and placed her on a mixed media background.

Now, I feel like I'm getting closer.  I want to embellish it more but the bad part is that I have packed away about 1/2 of my supplies because we plan to move in the near future.  I'm going to put this piece on hold until after my move and do what hopefully will be the final take!

For the background, I painted heavy paper with purples, covered it with a printed tissue paper, then sprayed blue and purple inks on it.  My next step was a stencil and I filled it in with modeling paste.  The paste picked up some of the ink colors so it blended in nicely.  I used gelatos around the head and up through the middle, added an embossed bird stamp, stamped letters and some paper punches.

It goes into storage for what hopefully will be a short period of time and then I will do the final stage.